Clinical Exercise: Pericardiocentesis
Scenario:
A 55 year old patient is admitted to the cardiac step-down ward following an open heart bypass procedure. During the course of the night the patient's blood pressure has been steadily decreasing and the patient complains of growing shortness of breath. In listening to the patient's chest you hear muffled heart sounds and observe some distension of the jugular veins.
Diagnosis:
The combination of a slow drop in blood pressure, distension of the jugular veins and muffled heart sounds suggests there maybe slow fluid effusion or small scale bleeding into the pericardial space following the surgery leading to a developing cardiac tamponade condition.
As this has been a slowly developing condition, you decide to perform a pericardiocentesis to remove the extra fluid to alleviate the acute symptoms and further monitor the patient.
Mechanism:
This Beck's Triad combination of signs, a drop in blood pressure, jugular distension, and muffled heart sounds are the classic signs of cardiac tamponade.
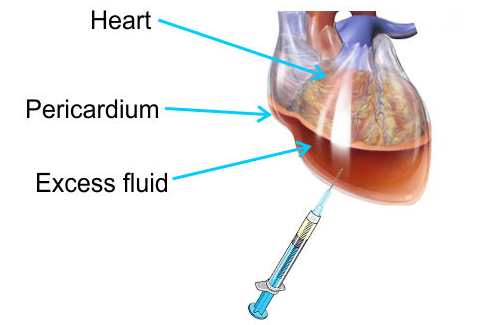
The condition of cardiac tamponade occurs when there is increased pressure on the heart from effusion of fluid in the pericardial space confined by the inelastic pericardium. This excessive fluid will compress the heart impeding the ability to pump blood and leading to the drop in blood pressure. The heart compression will also reduce passive venous filling of the heart resulting in distension in large veins, the most apparent of which is the jugular vein in the neck.
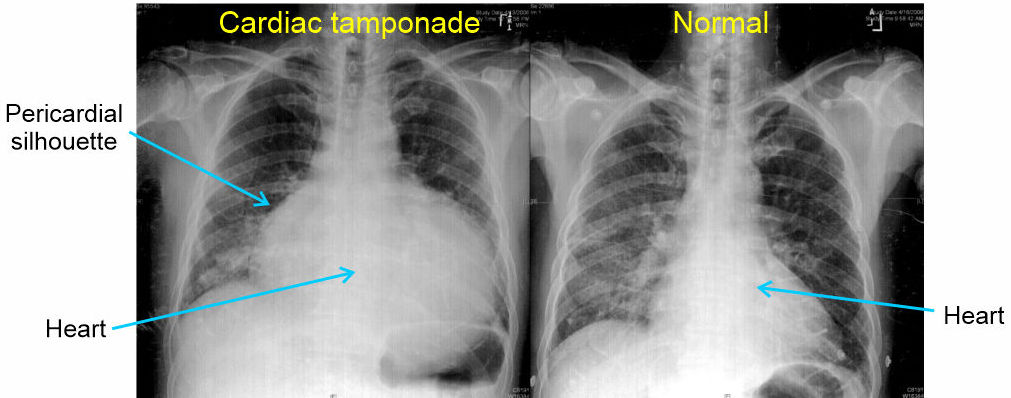
Diagnosis is usualy through a combination of clinical signs of Beck's Triad and ultrasound imaging. A chest x-ray is typically not a common choice of imaging modality for diagnosis, however a CTX is very useful to assess efficacy of treatment interventions. If an x-ray is performed, cardiac tamponade presents as an enlarged pericardial silhouette (outlne) formed into a globular or water bag shape due to the fluid in the sack.
In this scenario, there may be fluid effusion or mild bleeding occurring into the pericardial space from the bypass procedure. As the fluid built up slowly, signs of the condition may be subtle and slow in onset.
Small bleeding or effusion due to the bypass surgery may resolve over time without needing the intervention of a second open heart surgery. Thus, addressing the acute cardiac tamponade by removing the excess fluid with pericardiocentesis is an appropriate initial treatment. Even a few milliliters of fluid is often sufficient to improve cardiac stroke volume and manage the condition.
The procedure is most commonly performed using a subxiphoid approach as that carries the lowest risk of lung puncture and pneumothorax, but the procedure can be performed effectively parasternal at the left 5th or 6th intercostal space (i.e. the pericardial bare area where no lung tissue is present). Usually, this is performed using ultrasound guidance for accurate needle targeting.
Most commonly a catheter is inserted along a guide wire introduced via the needle. This allows the catheter to remain in place for several hours, or overnight, to ensure all fluid has drained and drain any additional excess fluid building up.
Treatment (perform these steps on the donor in a mock-procedure):
To treat this patient you need to remove excess fluid from within the pericardial space. This will be performed with a subxiphoid needle insertion through the chest wall into the pericardial space and the removal of excess fluid from the pericardial space.
PREPARATION: Send a member of your team to the instrument supply tables to fetch one syringe and one long (3-5") needle. Please take only the supply numbers indicated to ensure sufficient supplies are available for all tables.
The needle can be inserted multiple times so each team member can attempt the procedure.
1) Make a small incision (~1cm long) through the anterior wall of the pericardial sac to allow air into the pericardial space.
The pericardial space normally contains 10-50ml of fluid. In cardiac tamponade excess fluid accumulates in the pericardial space. To simulate this 'fluid' for this lab, we will allow air to enter via the small incision.
It is not uncommon to accidentally damage the pericardium when you were removing the chest plate, so there may already be a small opening in the pericardium allowing air to enter.
Technically, "air in the pericardium" would be a pneumopericardium (a relatively rare condition) while the presence of blood would be called a hemopericardium. Essentially, descriptive terminology for what is happening in the different cases.
2) Open the small (6-10ml) syringe packet and remove the syringe.
3) Open the needle package and remove the needle (note the protective sheath and keep that over the needle till it is to be used).
4) Place the needle onto the syringe, locking it in place with a twisting motion into the threads on the syringe.
This twist-on style is called a luer-lock. This is the most common syringe connection style in use today and has high security against the needle coming off inadvertantly. The older push-fitting style is uncommon in clinical medicine due to the lower stability of that design for the needle to accidentally come off.
5) For the subxiphoid pericardiocentesis, place the needle tip on the left between the xiphoid process and the costal margin (i.e. just to the left of the xiphoid process).
6) Angle the needle such that it is directed towards the left shoulder and tilt the needle to approximately 25-30 degrees from the skin of the abdomen.
The goal is to angle the needle such that it remains close to the posterior surface of the sternum, so as not to advance the needle into the abdominal cavity
The stomach is present in the abdominal cavity just inferior to the heart on the other side of the diaphragm and the goal is to avoid puncturing that organ.

7) Advance the needle while continuously keeping negative pressure in the syringe (i.e. pulling back gently on the plunger while advancing).
When the needle penetrates the pericardium you will feel a 'pop' and fluid (in our case air) will start aspirating into the syringe.
At this point, do not advance the needle further as you may injure a beating heart with the tip of the needle.
When available, ultrasound is highly advantageous for accurate positioning and becoming standard of care for this procedure.
8) Draw out a few milliliters of fluid (in our case air) and then fully withdraw the needle so that the next member of the team may perform the procedure.
NOTE: when finished the procedure ensure that the syringe and attached needle
are collected in one of your trays and transported to the sharps containers for
disposal.
Do not attempt to re-cap a needle - Re-capping is a leading
cause of needle-stick injury.
Never transport needles by hand - Always transport entire
syringe/needles in a tray.
Outcome:
The removal of excess fluid from the pericardial space allows the patient to have improved heart function. The patient reports breathing is easier and you observe reduction in the distention of the jugular vein and a restoration of blood pressure. Following monitoring, the patient makes a full recovery without additional intervention required.